Method & Notes
This document takes the user through the entire one-time installation process (including installation of development tools not required to run the app).
You can download the code here: https://github.com/bimblockchain/optimisation_prototype
You can download the blockchain connection plugin here
At the end of the document there is a workflow for demonstrating the app, as well as the steps required to load the app later once the entire installation process has been completed.
This section describes the method for installing the basic software packages and associated add-ins for all the BIM software required on a Windows 10 machine.
Install Rhino
1. Download “Rhino 5 for Windows – Evaluation” from here:
This is a full version which you can try for 90 days. After 90 days saving and plug-ins stop working, unless you buy a license.
2. Install Rhino 5
3. Run Rhino and check installed correctly.
Install Grasshopper
4. Download “Grasshopper WIP for Rhino 5 for Windows” (version 0.9.0076) from same link – this is a package of generative design tools.
5. Close Rhino and install Grasshopper – simply run the grasshopper_0.9.76.0.rhi file for anyone who uses the computer.
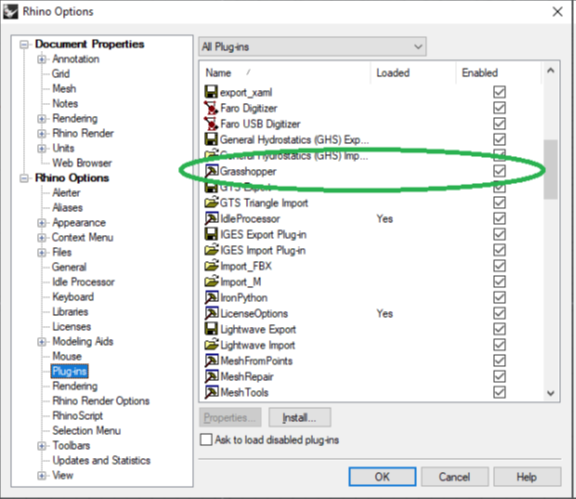
6. Run Rhino and check Grasshopper has installed correctly (Tools -> Options… -> Rhino Options -> Plug-ins).
Food4Rhino & TT Toolbox
7. Create an account on Food4Rhino (https://www.food4rhino.com).
8. Download the Thorton Tomassetti Plugin for Grasshopper (TT Toolbox 1.9) from Food4Rhino
(https://www.food4rhino.com/app/tt-toolbox).
9. Right click the Thorton Tomassetti Plugin .zip file downloaded from Food4Rhino. Click Properties
-> Unblock -> Apply -> OK.
10. Extract the zip file to a folder on local hard drive.
11. Move or copy the folder ‘TT Toolbox’ to your local grasshopper components folder:
C:\Users\[USERNAME]\AppData\Roaming\Grasshopper\Libraries
(You can find this folder also by running Rhino, typing “GrasshopperFolders” in Rhino command line, and selecting “Components”)
12. Start Rhino and Grasshopper (type “Grasshoppper” in Rhino command line) and look for the TT Toolbox tab in the Grasshopper Ribbon.
Install Millipede
13. Download Millipede, a plug-in for Grasshopper
https://www.grasshopper3d.com/group/millipede
14. Right click the Millipede Plugin .zip file downloaded from http://www.sawapan.eu/
. Click Properties ->
Unblock -> Apply -> OK.
15. Extract the zip file to a folder on local hard drive.
16. Move or copy the folder ‘MillipedeReleaseMarch2014F’ to your local grasshopper components folder: C:\Users\[USERNAME]\AppData\Roaming\Grasshopper\Libraries
(You can find this folder also by running Rhino, typing “GrasshopperFolders” in Rhino command line, and selecting “Components”)
17. Start Rhino and Grasshopper (type “Grasshoppper” in Rhino command line) and look for the
Millipede tab in the Grasshopper Ribbon.
Install LunchBox
18. Download LunchBox version 2018.11.16, a plug-in for Grasshopper from:
https://www.food4rhino.com/app/lunchbox
19. Run lunchbox.installer.application file to install LunchBox, leave Grasshopper tick box ticked.
20. Start Rhino and Grasshopper (type “Grasshoppper” in Rhino command line) and look for the Millipede tab in the Grasshopper Ribbon.
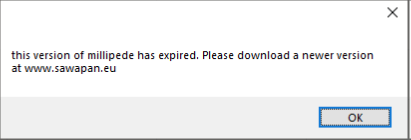
21. Open the Grasshopper file (optimisation_problem.gh) and it should open successfully. You may see the following error message, which can safely be ignored.
Install: Ethereum Blockchain
This section describes the method for installing the basic software packages and associated add-ins for all the blockchain software required on a Windows 10 machine.
Chocolatey
1. The first step is to install Chocolatey. Start by opening a PowerShell window with administrator rights (right click, ‘run as administrator’). In PowerShell, type:
Set-ExecutionPolicy Bypass -Scope Process -Force
2. If prompted, press ‘A’ to accept the elevated privileges. Chocolatey can now be installed by entering:
iex ((New-Object System.Net.WebClient).DownloadString(‘https://chocolatey.org/install.ps1’))
Note that this step doesn’t always work through a VPN or firewall.
Check the installed version by typing:
choco –version
Installed version v0.10.15
3. Close, and then reopen PowerShell, again, run as administrator. With that done, Chocolatey can be used to install the other tools that are required.
VS Code and GIt
4. Enter the following into PowerShell:
choco install vscode –y //have a wait a bit…
choco install git -y //have a wait a bit…
Note that if you already have any of these components installed, then use the command ‘choco upgrade’ rather than ‘choco install’.
This installs the IDE (VS Code) and the source control framework (Git), setting up the very basics of the dev environment.
5. You need close and reopen PowerShell as an Admin again at this stage.
You can check the installed versions using the following commands:
code –version
git –version
Download Github Desktop from desktop.github.com
VS Code version installed: 1.37.1
Git version installed: v2.23.0.windows.1
Node Version Manager, Node.js and Node Package Manager
6. Next install Node Version Manager:
choco install nvm –y //have a wait a bit…
Close Powershell and re-open Powershell as Admin
You can check the installed version using the following command:
nvm version
Node Version Manager version installed: 1.1.7.
7. Then install a specific version of npm and node.js using NVM:
nvm install 11.0.0
This installs node.js and npm.
Note that the latest version of npm and node.js can be installed using NVM using the command:
nvm install latest.
Note this specific version is required for the Truffle Suite Drizzle packages.
8. To ensure the node command is using the correct version of node.js and npm:
nvm use 11.0.0
It shows “now using node v11.0.0”
This ensure that nvm is using node v11.0.0 (64-bit).
Note that you can list all the installed node versions, and see which one is currently in use by the
command: nvm list
9. To confirm the node and npm versions:
node –version
Should return: v11.0.0
npm –version
Should return: 6.4.1
From this point onwards using the npm command will use the version 6.4.1.
Truffle Development Framework
10. With Node.js installed, use npm to install the Truffle framework. Run the following command in Powershell:
npm install -g truffle
You can check the installed version using the following command:
truffle version
Truffle version installed: v5.0.38 (core: 5.0.38)
Solidity version installed: v0.5.8 (solc-js)
Web3.js version installed: v.1.2.1
11. Install Python via an Admin Powershell console:
npm install -g windows-build-tools
This installation may take some time.
This is required later by Drizzle (an npm package).
12. Confirm Truffle version:
truffle version
Truffle version installed: v5.0.38 (core: 5.0.38)
Solidity version installed: v0.5.8 (solc-js)
Web3.js version installed: v.1.2.1
Ganache Command Line Local Blockchain
13. Use npm to install Ganache CLI, the command line interface version of the Ganache local
Ethereum blockchain, part of the Truffle Development Suite.
Run the following command in a Powershell Admin console:
npm install -g ganache-cli
You can check the installed version using the following command:
ganache-cli –version
Ganache CLI version installed: v6.7.0 (ganache-core: 2.8.0)
Status Check
14. A quick status check
At this stage, the environment is set up for some basic Ethereum dev. Easy when you know how!
Check that the installs have completed correctly by checking the version of the packages. Type into PowerShell:
node –version
Should return: v11.0.0
npm –version
Should return: 6.4.1
truffle –version
Should return: Truffle v5.0.38 (core: 5.0.38)
Note that these products are upgraded frequently, and the version numbers may not match. I’d recommend trying the latest versions (apart from node and npm), and if there are any issues, then revert to the versions described in this document.
Configure Visual Studio Code for Ethereum Development
At this stage, all the required packages are installed, and it is possible to use notepad and command line tools to do everything required. The aim, however, is to use VS Code for development. In this section, we’ll configure Visual Studio Code for Ethereum development.
We’ll use one of the Truffle Framework ‘boxes’ to show that we have everything configured correctly, without having to write any code ourselves.
15. Choose which folder you want to be the root for this project and navigate there with
PowerShell. Then execute:
mkdir TruffleTest; cd TruffleTest; code .
The final command in the chain is “code .”, which opens an instance of Visual Studio Code in the folder from which the command is executed.
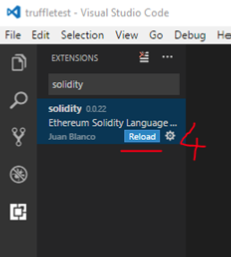
16. Install the solidity extension for VSCode as shown (steps 1,2,3,4 shown):
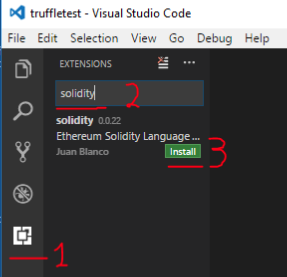
(Choose “Solidity 0.0.64” by Juan Blanco)
17. Then install the Material Icon Theme, following the same process as for the Solidity extension.
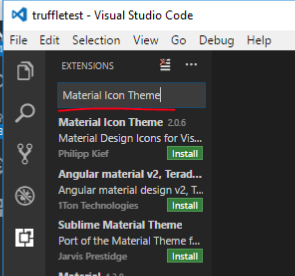
Choose the one by Philipp Kief
From now on, we’ll use the VS Code integrated PowerShell terminal. Open the terminal by
clicking Ctrl+` or Ctrl+’ or View -> Terminal. PowerShell should be the default terminal.
Reopen Visual Studio Code
18. The Truffle Framework provides ‘boxes’, which are basically pre-packaged examples to get started with. These are a great way to play with the Truffle functionality and provide a quick way of testing that everything is set up correctly. In the VS Code terminal, type:
truffle unbox metacoin
The output from the console should look like this:
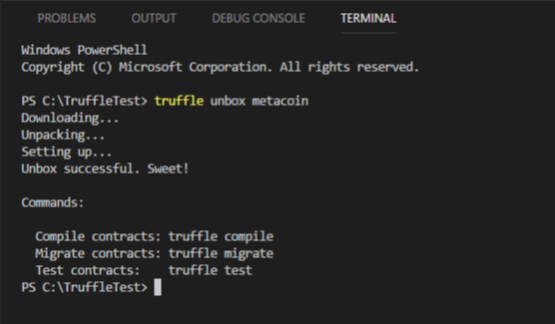
The files for the Truffle MetaCoin example have been downloaded. The end result should look like this.
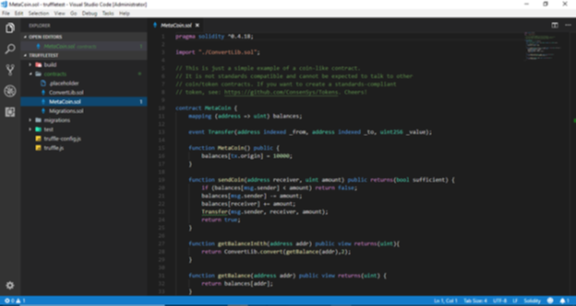
Before we proceed, it’s worth having a dig around in this code.
The main application code is written in Solidity in the file ‘MetaCoin.sol’. This relies on a helper library called ‘ConvertLib.sol’. These files will be compiled and deployed to a simulated blockchain using Truffle.
Truffle provides a unit testing framework, and this sample comes with a couple of test classes, in the ‘tests’ folder. Examples written in Solidity and JavaScript are provided. These will be run through the Truffle testing framework shortly.
19. One change we need to make to the code to ensure this works with our local blockchain, Ganache CLI, is to go into the truffle-config.js file in the root of the folder and uncomment lines 7-20. This can be done by selecting those rows, and pressing Ctrl+K+U.
20. Save the updated configuration file by pressing Ctrl+S.
Compile the Contracts
21. We will compile the MetaCoin example. Simple type into the VS Code console:
truffle compile
The console output should look like this:
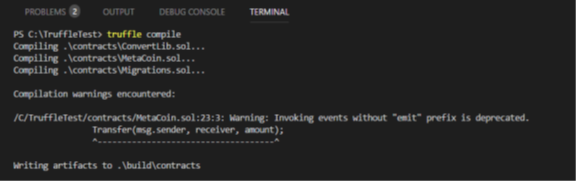
You will notice that a ‘build’ folder has been added to the list of files, which contains the compiled json files.
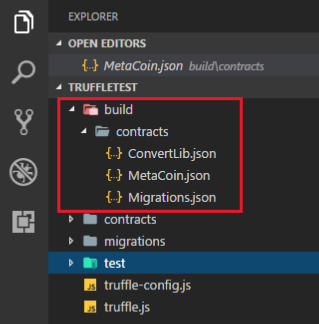
What we have achieved here doesn’t seem very impressive. We have just, however, compiled our first Dapp!
Deploying the Contracts
22. Now we need to migrate the contracts to a local blockchain, in our case Ganache CLI. The first step is to spin up our local blockchain.
In a PowerShell window, separate from the terminal in VS Code, type:
ganache-cli -p 7545
This will start a local blockchain
accessible via port 7545.
If you have a firewall (e.g. Windows Defender Firewall), you’ll need to click ‘Allow’ to allow truffle network access.
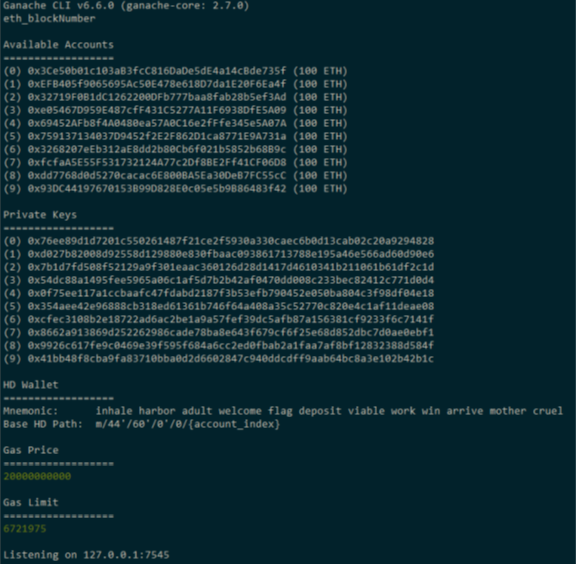
This command has launched the Ganache CLI, part of the truffle development environment, a local blockchain automatically configured with 10 accounts and keys. This allows contracts to be deployed into this local environment.
You should see something similar to the screenshot below. Note that your account addresses, private keys, and mnemonic will differ from the ones shown.
Leave this window open for as long as the local blockchain is required.
We now have a local blockchain, that operates similarly (but not identically) to the real
Ethereum blockchain, and allows us to test deployment and execution of the code locally without needing to interface with an actual blockchain.
23. Go back into VS Code. We now want to deploy the compiled contracts to our local blockchain.
To do this, simply type:
truffle migrate
This will deploy the contracts to the local blockchain. The output should look like:
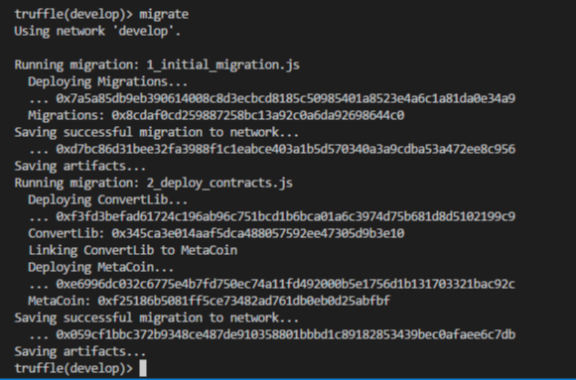
Again, it’s not totally obvious what has happened here. The code that we compiled in an earlier step has been successfully deployed to a simulated blockchain. This allows us to run the unit tests, from the ‘test’ folder.
Note that if contracts have been previously migrated, but changes have been made since and you wish to re-deploy these contracts, the command required is: truffle migrate –reset
Testing the Contracts
24. The last thing to do at this stage is to make sure that the Truffle tests can be run. Simply type:
truffle test
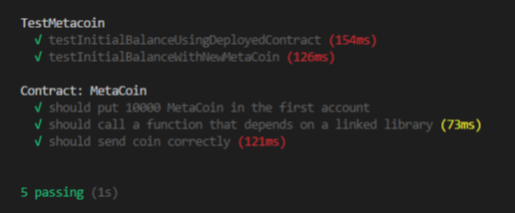
The unit tests will run, and hopefully
pass.
Again, that doesn’t look like much, but a lot is going on behind the scenes. The Solidity code that we compiled in the first step has new been deployed to a simulated blockchain, and a set of unit tests have been run.
Summary
This procedure has taken us from a completely fresh install of Windows 10, to an operational environment for Ethereum development. We have downloaded, compiled, deployed, and tested a Dapp.
Install: BIM Manager
Nodemon
1. Nodemon is a utility that will monitor for any changes in your source and automatically restart your server. This is used to run the API.
Install this using npm with the command:
npm install -g nodemon
You can check the installed version using the following command:
nodemon –version
nodemon version installed: 1.19.3
Metamask for Google Chrome Browser
2. If you don’t already have the Google Chrome browser installed, install it from here:
https://www.google.com/chrome/
3. Metamask is a wallet built into your Chrome web browser. Install the Metamask Chrome extension:
https://chrome.google.com/webstore/detail/metamask/nkbihfbeogaeaoehlefnkodbefgpgknn
4. Once Metamask is installed, you should have an orange fox icon in the top bar of the Chrome browser. To set up your Metamask, click on ‘Get Started’, and then ‘No, I already have a seed phrase’.
5. When requested, choose a password, and enter the seed phrase: “squeeze enough elephant crisp laundry rate turkey smooth clap dinosaur proud destroy”.
6. Next, we want to be able to connect Metamask to our local Ganache CLI Blockchain.
Click on the Metamask orange fox icon, then on the coloured icon in the top right of the window that appears, and then on ‘Settings’. Scroll down and click on ‘Networks’, and then click the blue button at the bottom, ‘Add Network’.
7. Enter the “Network Name” and “New RPC URL” both as: http://localhost:7545, and click save. Metamask should now be configured to connect to the local Ganache CLI blockchain.
If it doesn’t work at first, re-do step 22 “ganache-cli –p 7545” will probably be ok
Install and run IPFS
8. Open PowerShell as administrator. Use Chocolatey to install IPFS.
Enter the following into PowerShell:
choco install ipfs –y
If it doesn’t work on Powershell, try on Visual Studio Code
Note that if you already have IPFS installed, then use the command ‘choco upgrade’ rather than
‘choco install’.
You can check the installed versions using the following commands:
ipfs –version
IPFS version installed: 0.4.22
9. Initialise IPFS by the following command:
ipfs init
10. Update IPFS config file to allow CORS to operate correctly. Type:
ipfs config –json API.HTTPHeaders.Access-Control-Allow-Origin ‘[\”*\”]’
11. Run an IPFS daemon by the following command:
ipfs daemon
If you have a firewall (e.g. Windows Defender Firewall), you’ll need to click ‘Allow’ to allow IPFS network access.
Installing BIM Manager
12. The source code for BIM manger is on Github.
Choose which folder you want to be the root for this project and navigate there with PowerShell. Then execute:
mkdir BIMManager; cd BIMManager
13. Now clone the BIM Manager Github repository into your local folder with the command:
git clone https://github.com/bimblockchain/optimisation_prototype
You will need to enter your GitHub username and password, unless you have already done this previously.
14. Navigate into the folder which has been created:
cd optimisation_prototype
15. Install all the npm packages required by the app:
cd app; npm install
This may take some time as node package manager fetches all the required packages.
There might possibly be problems at step 15 “npm install”
(Did not continue installation attempts afterwards (from p.17 of the instruction PDF), but the proposed steps are listed below:)
16. Install all the npm packages required by the API:
cd ..\api; npm install
17. Install all the npm packages required by the smart contract:
cd ..\blockchain; npm install
This may take some time as node package manager fetches all the required packages.
Compile & Migrate the Contracts
18. We will compile the BIM Blockchain Dapp. Type into the console:
truffle compile
19. Now we need to migrate the contracts to a local blockchain, in our case Ganache CLI. The first step is to spin up our local blockchain.
In a separate PowerShell window, type:
ganache-cli -m “squeeze enough elephant crisp laundry rate turkey smooth clap dinosaur proud
destroy” -p 7545
This will start a local blockchain accessible via port 7545 using the same seed phrase as Metamask has been set up to use.
If you have a firewall (e.g. Windows Defender Firewall), you’ll need to click ‘Allow’ to allow truffle network access.
This command has launched the Ganache CLI, part of the truffle development environment, a local blockchain automatically configured with 10 accounts and keys. This allows contracts to be deployed into this local environment.
You should see something similar to the screenshot below. Note that your account addresses, private keys, and mnemonic will differ from the ones shown.
Leave this window open for as long as the local blockchain is required.
We now have a local blockchain, that operates similarly (but not identically) to the real Ethereum blockchain, and allows us to test deployment and execution of the code locally without needing to interface with an actual blockchain.
20. We now want to deploy the compiled contracts to our local blockchain. In a new PowerShell window, simply type:
truffle migrate (you need to go to directory ~/BIMManager/optimization_prototype/blockchain)
Note that if contracts have been previously migrated, but changes have been made since and you wish to re-deploy these contracts, the command required is: truffle migrate –reset
Testing the Contracts
21. The last thing to do at this stage is to make sure that the Truffle tests can be run. Simply type:
truffle test
The unit tests will run, and hopefully pass.
Run the API
22. Navigate to the API folder and execute the API run script. Type:
cd ..\api; npm run api
Run the App
23. Switch to the app folder and execute the app run script. Type:
cd ..\app; npm run start
Now you’re live! The locally hosted website should load at the address: localhost:3000
You can now skip onto the Demo: Workflow sub-section of the ‘Demonstration’ section to get
started using the app.
Postman
24. Postman is a utility for testing APIs. This doesn’t need to be installed to run the app.
Install this using npm with the command:
choco install postman -y
Postman version installed: v.7.5.0
25. Run postman from the start menu
26. Postman will need you to create a personal account with username and password before you can proceed.
27. Once you have an account with postman, you’ll be in the main app screen. Click ‘Import’ in the top left, then choose the file ‘api\bim-blockchain.postman_collection.json’ from the BIM Blockchain install folder.
28. Click on ‘Collections’ on the top left, and then the ‘bim-blockchain’ collection. Click on ‘bimblockchain-test’ request below.
29. Replace the “ContractAddress” with the solution contract address from the web UI, and replace the “PrivateKey” with “0x291930bc51cb713ff90d332dc20d5289844c6bf996a8a68122361fe7326eb3d3”
30. Click the blue ‘Send’ button.
Demonstration
Demo: Initialise
Once you have already been through the entire set-up, for future demonstrations, you only need to undertake the follow steps.
1. Start local Ganache blockchain:
ganache-cli -m “squeeze enough elephant crisp laundry rate turkey smooth clap dinosaur proud
destroy” -p 7545
2. ipfs daemon
3. In blockchain folder:
truffle migrate –reset
4. In the API folder:
npm run api
5. In the app folder:
npm run start
Demo: Workflow
This workflow takes you through a demonstration of the app. It needs all the main components to be installed as described previously in this document.
1. Register as Problem Owner
2. Create a new problem as the problem owner
3. Click ‘Load’
4. Upload file to IPFS
5. Send hash to problem contract, refresh
6. Open the problem contract
7. Register as a problem optimiser
8. Create a new solution to an open problem ID
9. Load solution
10. Click ‘IPFS File Link’
11. Enter a value, say ‘10’, and then ‘Send Value’
12. Open Rhino, then Grasshopper, and open the Optimisation Problem
13. Click on ‘Blockchain’
14. Drag and drop the one icon onto the flowsheet.
15. Take the solution contract address from the web UI and paste that into ‘CtrAddr’ by right clicking and setting text.
16. Paste in the private key for the account (0x291930bc51cb713ff90d332dc20d5289844c6bf996a8a68122361fe7326eb3d3) into ‘pkey’ by right clicking and setting text.
17. Choose a value to send to the solution contract (say 20) and enter this into ‘Val’ by by right clicking and setting number.
18. As a Problem Owner, click ‘Load’ to load the problem if not already loaded.
19. Paste in the solution address to ‘_winner’ and click ‘Solve’
20. Click ‘Complete’.
21. Click ‘Cancel’